The Menu control like the TreeView control supports hierarchical data. You can bind the Menu to a data source, or you can fill it by hand (declaratively or programmatically) using MenuItem objects. The MenuItem objects don’t support check boxes and you can’t set programmatically their expanded/collapsed state. The next table lists MenuItem properties you can use:
|
Property |
Description |
| Text | The text displayed in the menu for this item (when displayed). |
| ToolTip | The tooltip text that appears when you hover over the menu item. |
| Value |
You can use it to keep a value with additional data about the menu item. For example you can use it to store a unique ID, which you are planning to use when handling click events to identify the menu item or to look up more information. This value is not displayed. |
| NavigateUrl |
You can use it to forward automatically the user to the corresponding URL when clicks this item. If you don’t set it you should write a code which will react to the Menu.MenuItemClick event to decide what action you want to perform. |
| Target |
If the NavigateUrl property is set, this sets the target window or frame for the link. If Target isn’t set, the new page is opened in the current browser window. The Menu also exposes a Target property, which you can set to apply a default target for all MenuItem instances. |
| Selectable | If false, this item can’t be selected. Usually you’ll set this to false only if the item is a subheading that contains selectable child items. |
| ImageUrl | The image that’s displayed next to this node. |
| PopOutImageUrl | The image that’s displayed next to the menu item (on the right) if it contains subitems. By default, this is a small solid arrow. |
| SeparatorImageUrl | The image that’s displayed immediately underneath this menu item, to separate it from the following item. |
The Menu contains a collection of MenuItem objects in the Items property, and each MenuItem has a ChildItems collection that contains nested items. The next example is taken from the article: How to use the TreeNode object in selection mode in ASP.NET in VB.NET, but:
1. The file TreeViewTest.aspx is replaced with MenuTest.aspx.
2. The code behind file MenuTest.aspx.vb is used code from the TreeViewTest.aspx.vb where: MenuItem replaced TreeNode, ChildItems replaced ChildNodes, Items replaced Nodes.
File MenuTest.aspx
<body>
<form id=”form1″ runat=”server”>
<div>
<asp:Label ID=”LblInfo” runat=”server” Text=””></asp:Label>
<br />
<asp:Menu ID=”Menu” runat=”server” onmenuitemclick=”Menu_MenuItemClick” ></asp:Menu>
</div>
</form>
</body>
File MenuTest.aspx.vb
Imports System
Imports System.Collections.Generic
Imports System.Linq
Imports System.Web
Imports System.Web.UI
Imports System.Web.UI.WebControls
Imports System.Data
Imports System.IO
Namespace MenuVB
Public Partial Class MenuTest
Inherits System.Web.UI.Page
Protected Shared ds As DataSet = Nothing
Protected Shared dtBook As DataTable = Nothing
Protected Function InitData() As Boolean
If ds Is Nothing Then
Dim file As String = Path.Combine(Request.PhysicalApplicationPath, “App_Data\BooksList.xml”)
Dim fs As New FileStream(file, FileMode.Open)
ds = New DataSet()
ds.ReadXml(fs)
dtBook = ds.Tables(“Book”)
Return True
End If
Return False
End Function
Protected Sub Page_Load(sender As Object, e As EventArgs)
If Not Page.IsPostBack Then
InitData()
‘ Loop through the books records.
For Each row As DataRow In ds.Tables(“Book”).Rows
‘ Use the constructor that requires just text
‘ and a nondisplayed value.
‘ Create the menu item for this category.
Dim itemISBN As New MenuItem(“ISBN-13:” & row(“ISBN-13”).ToString(), row(“ISBN-13”).ToString())
Menu.Items.Add(itemISBN)
Dim itemTitle As New MenuItem(“Title: ” & row(“Title”).ToString())
Dim itemAutor As New MenuItem(“Author: ” & row(“Author”).ToString())
Dim itemAddInfo As New MenuItem(“Additional info”)
itemISBN.ChildItems.Add(itemTitle)
itemISBN.ChildItems.Add(itemAutor)
itemISBN.ChildItems.Add(itemAddInfo)
‘ Get the children (additional information) for this parent (book).
Dim childRows As DataRow() = row.GetChildRows(ds.Relations(0))
For Each childRow As DataRow In childRows
Dim nodePublisher As New MenuItem(“Publisher: ” & childRow(“Publisher”).ToString())
Dim nodePages As New MenuItem(“Pages: ” & childRow(“Pages”).ToString())
itemAddInfo.ChildItems.Add(nodePublisher)
itemAddInfo.ChildItems.Add(nodePages)
Next
Next
End If
End Sub
Protected Sub Menu_MenuItemClick(sender As Object, e As MenuEventArgs)
If Menu.SelectedItem Is Nothing Then
Return
End If
If Menu.SelectedItem.Depth = 0 Then
LblInfo.Text = “You selected Book ID: “
ElseIf Menu.SelectedItem.Depth = 1 Then
LblInfo.Text = “You selected Additional info ID: “
End If
LblInfo.Text += Menu.SelectedItem.Value
End Sub
End Class
End Namespace
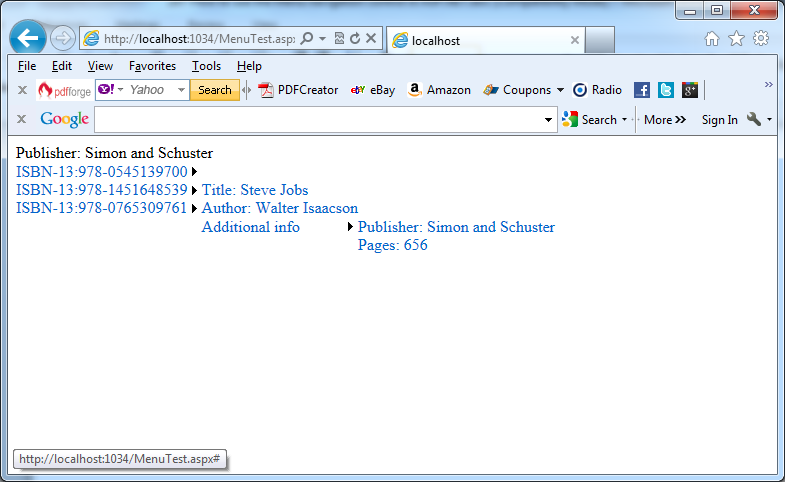
The next picture shows the result:
The used example shows that the Menu and TreeView controls expose similar programming models. They also have a similar style-based formatting model. But a few differences exist which are listed in the next table:
|
Menu |
TreeView |
| Displays a single submenu |
Can expand an arbitrary number of node branches at a time. |
|
Displays a root level of links in the page. All other items are displayed using fly-out menus that appear over any other content on the page |
Shows all its items inline in the page. |
| Does not support this functionality. | Supports on-demand filling and client callbacks. |
| Supports templates. | Does not support this functionality. |
|
Supports horizontal and vertical layouts, depending on the Orientation property. |
Supports only vertical layouts. |

