When you want to implement Forms Authentication in your web application you have to create a custom login page. This page collects user name and password from the user and validates them against the credentials stored in the credential store. You can store credentials in web.config as described in the article How to use web.config as credential store with Forms Authentication in ASP.NET, or in any other store such as an external database.
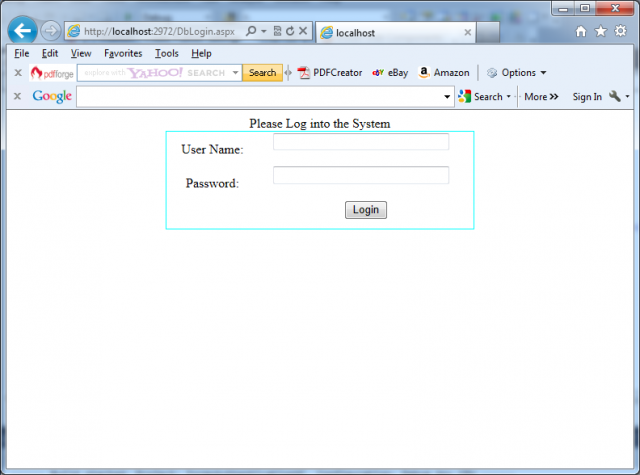
The login page you have to create must contains the parts shown in the next picture:
You must include the code for validating the credentials. Validation controls are especially important to let the user enter only valid values for a user name and a password. One of the basic principles highlighted in the article How to create secure web applications in ASP.NET is never trust user input. Validation adheres to this principle by ensuring that only valid values are entered. Here you can see all the controls contained on the login page:
<form id=”form1″ runat=”server”>
<div align=”center”>
Please Log into the System<br />
<asp:Panel ID=”MainPanel” runat=”server” BorderColor=”Aqua” BorderStyle=”Solid” BorderWidth=”1px”
Height=”120px” Width=”380px” ViewStateMode=”Enabled”>
<table style=”width: 100%;” border=”0″ cellpadding=”0″ cellspacing=”0″>
<tr>
<td width=”30%” height=”43px”>
<asp:Label ID=”UsernameLabel” runat=”server” Text=”User Name:”></asp:Label>
</td>
<td width=”70%” height=”43px”>
<asp:TextBox ID=”UsernameText” runat=”server” Width=”80%” />
<asp:RequiredFieldValidator ID=”UsernameRequiredValidator” runat=”server” ErrorMessage=”*”
ControlToValidate=”UsernameText” />
<br />
<asp:RegularExpressionValidator ID=”UsernameValidator” runat=”server” ControlToValidate=”UsernameText”
ErrorMessage=”Invalid username” ValidationExpression=”[\w| ]*” />
</td>
</tr>
<tr>
<td width=”30%” height=”26px”>
<asp:Label ID=”PasswordLabel” runat=”server” Text=”Password:”></asp:Label>
</td>
<td width=”70%” height=”26px”>
<asp:TextBox ID=”PasswordText” runat=”server” Width=”80%” TextMode=”Password” />
<asp:RequiredFieldValidator ID=”PwdRequiredValidator” runat=”server” ErrorMessage=”*”
ControlToValidate=”PasswordText” />
<br />
<asp:RegularExpressionValidator ID=”PwdValidator” runat=”server” ControlToValidate=”PasswordText”
ErrorMessage=”Invalid password” ValidationExpression='[\w| !”§$%&/()=\-?\*]*’ />
</td>
</tr>
<tr>
<td width=”30%” height=”26px”>
</td>
<td width=”70%” height=”26px”>
<asp:Button ID=”LoginAction” runat=”server” Text=”Login” OnClick=”LoginAction_Click” /><br />
<asp:Label ID=”LegendStatus” runat=”server” EnableViewState=”false” Text=”” />
</td>
</tr>
</table>
</asp:Panel>
<br />
</div>
</form>
The validation controls serve two purposes:
1. The RequiredFieldValidator controls ensure that both a user name and password are entered in a valid format containing only the characters allowed for user names and passwords.
2. The RegularExpressionValidator controls ensure that only valid values are entered in the User Name text field and in the Password text field. For example, the user name may contain letters, digits, and spaces only.
Therefore, the validation expression looks like this:
ValidationExpression=”[\w| ]*”
The \w character class is equivalent to [a-zA-Z_0-9], and the space afterward allows spaces in the user name. The password, for example, may also contain special characters. Therefore, the validation expression looks different from the previous one, as shown here:
ValidationExpression='[\w| !”§$%&/()=\-?\*]*‘
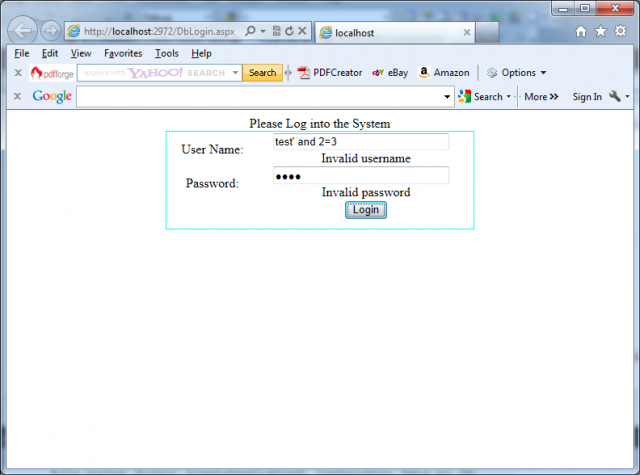
Note that the single quote is used for enclosing the attribute value, because this uses the double quote as the allowed special character. Furthermore, because the attribute is contained in the tag code (and therefore the HTML entity), & indicates that the ampersand (&) character is allowed in the password. You can see the validation controls in action in the next picture:
The last step for creating the login page is to write the code for validating the credentials against the values entered by the user. You have to add the necessary code to the Click event of the login button.
Because the following Click event is using the credentials store of the web.config file, validation is easy:
protected void LoginAction_Click(object sender, EventArgs e)
{
Page.Validate();
if (!Page.IsValid) return;
if (FormsAuthentication.Authenticate(UsernameText.Text, PasswordText.Text))
{
// Create the ticket, add the cookie to the response,
// and redirect to the originally requested page
FormsAuthentication.RedirectFromLoginPage(UsernameText.Text, false);
}
else
{
// User name and password are not correct
LegendStatus.Text = “Invalid username or password!”;
}
}
Important notes:
1. Because forms authentication uses standard HTML forms for entering credentials, the user name and password are sent over the network as plain text. This is an obvious security risk—anyone who intercepts the network traffic will be able to read the user names and passwords that are entered into the login form. For this reason, it is strongly recommended that you encrypt the traffic between the browser and the server using SSL.
2. At the beginning of the procedure the Page.IsValid condition is included. The reason for this is that validation controls by default use JavaScript for client-side validation. When calling Page.Validate(), the validation takes place on the server. This is important for browsers that either have JavaScript turned off or don’t support it. Therefore, if you don’t include this part, validation will not happen if the browser doesn’t support JavaScript or doesn’t have JavaScript enabled. So, you should always include server-side validation in your code.
3. The FormsAuthentication class provides two methods that are used in this example. The Authenticate() method checks the specified user name and password against those stored in the web.config file and returns a Boolean value indicating whether a match was found. You do not need to create an instance of FormsAuthentication to use them, because the methods of FormsAuthentication are static, and you simply access them through the name of the class.
if (FormsAuthentication.Authenticate(UsernameText.Text, PasswordText.Text))
If a match is found for the supplied credentials, you can use the RedirectFromLoginPage() method, as shown here:
FormsAuthentication.RedirectFromLoginPage(UsernameText.Text, false);
This method performs several tasks at once:
1. It creates an authentication ticket for the user.
2. It encrypts the information from the authentication ticket.
3. It creates a cookie to persist the encrypted ticket information.
4. It adds the cookie to the HTTP response, sending it to the client.
5. It redirects the user to the originally requested page (which is contained in the query string parameter of the login page request’s URL).
The second parameter of RedirectFromLoginPage() indicates whether a persistent cookie should be created. Persistent cookies are stored on the user’s hard drive and can be reused for later visits.
If Authenticate() returns false, an error message is displayed on the page. Feedback such as this is always useful. However, make sure it doesn’t compromise your security, by creating a login page that provides separate error messages depending on whether the user has entered a user name that isn’t recognized or a correct user name with the wrong password. This is usually not a good approach, because if a malicious user is trying to guess a user name and password, the user’s chances increase considerably if your application gives this sort of specific feedback.


