The Wizard control is a more fascinating version of the MultiView control which is described in the article: How to use the MultiView control in ASP.NET pages. The control shows one of several views at a time, but you can customize it by using navigation buttons, a sidebar with step links, styles, and templates. Usually by using wizards the users move linearly from single step to the one immediately following it. The ASP.NET Wizard control also supports nonlinear navigation and you can ignore a step based on information the user supplies.
The Wizard control, by default, supplies navigation buttons and a sidebar with links for each step on the left. If you want to enforce strict step-by-step navigation and prevent the user from jumping out of sequence, you can hide the sidebar by setting the Wizard.DisplaySideBar property to false. You can supply the content for each step by using any HTML or ASP.NET controls.
If you want to use a wizard in ASP.NET you should add the steps and their content using <asp:WizardStep> tag in it. The next table lists most important pieces of information taken by each step:
|
Property |
Description |
| Title |
Describes the name of the step. This name is used for the next of the links in the sidebar. |
| StepType | Specifies the type of step, as a value from the WizardStepType enumeration. You can use this property to determine the type of navigation button shown. Choices include:
– Start – shows a Next button. – Step – shows Next and Previous buttons. – Finish – shows Finish and Previous buttons. – Complete – shows no button and hides the sidebar if it’s enabled. – Auto – the step type is inferred from the position in the collection. The default value is Auto, which means that the first step is Start, the last step is Finish and other steps are Step. |
| AllowReturn | This property specifies whether the user can return to this step. If its value is false:
– The user will not be able to return. – The sidebar link for this step will have no effect. – The Previous button of the following step will either skip this step or be hidden completely (depending on the AllowReturn value of the preceding steps. |
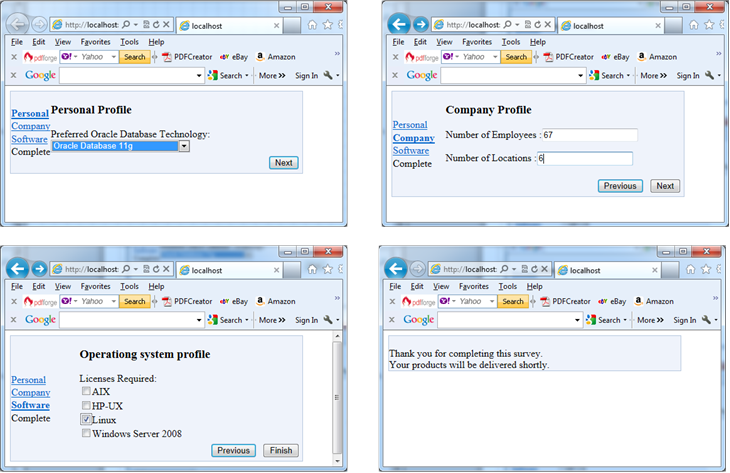
The following wizard contains four steps that, taken together, represent a simple survey. The StepType adds a Complete step at the end, with a summary. The navigation buttons and sidebar links are added automatically:
<body>
<form id=”form1″ runat=”server”>
<div>
<asp:Wizard ID=”Wizard1″ runat=”server” Width=”467px” BackColor=”#EFF3FB” BorderColor=”#B5C7DE”
BorderWidth=”1px”>
<WizardSteps>
<asp:WizardStep ID=”WizardStep1″ runat=”server” Title=”Personal”>
<h3>
Personal Profile</h3>
Preferred Oracle Database Technology:
<asp:DropDownList ID=”lstDatabase” runat=”server”>
<asp:ListItem>Oracle Database 11g</asp:ListItem>
<asp:ListItem>Real Application Clusters</asp:ListItem>
<asp:ListItem>Data Warehousing</asp:ListItem>
<asp:ListItem>Exadata Database Machine</asp:ListItem>
<asp:ListItem>Database Appliance</asp:ListItem>
<asp:ListItem>Enterprise Manager for Database</asp:ListItem>
</asp:DropDownList>
<br />
</asp:WizardStep>
<asp:WizardStep ID=”WizardStep2″ runat=”server” Title=”Company”>
<h3>
Company Profile</h3>
<p>
Number of Employees :<asp:TextBox ID=”txtEmpCount” runat=”server” /></p>
<p>
Number of Locations :<asp:TextBox ID=”txtLocCount” runat=”server” /></p>
</asp:WizardStep>
<asp:WizardStep ID=”WizardStep3″ runat=”server” Title=”Software”>
<h3>
Operationg system profile</h3>
Licenses Required:
<asp:CheckBoxList ID=”lstTools” runat=”server”>
<asp:ListItem>AIX</asp:ListItem>
<asp:ListItem>HP-UX</asp:ListItem>
<asp:ListItem>Linux</asp:ListItem>
<asp:ListItem>Windows Server 2008</asp:ListItem>
</asp:CheckBoxList>
</asp:WizardStep>
<asp:WizardStep ID=”Complete” runat=”server” Title=”Complete” StepType=”Complete”>
<br />
Thank you for completing this survey.<br />
Your products will be delivered shortly.<br />
</asp:WizardStep>
</WizardSteps>
</asp:Wizard>
</div>
</form>
</body>
The next picture presents the wizard’s steps:

