If you want to retrieve a single user and a list of users through the Membership class from the membership store, you can create a simple page with a GridView control for binding the users to the grid, as follows:
<html xmlns=”https://www.w3.org/1999/xhtml”>
<head runat=”server”>
<title>Display Users Page</title>
</head>
<body>
<form id=”form1″ runat=”server”>
<div>
<asp:GridView ID=”UsersGridView” runat=”server” DataKeyNames=”UserName” AutoGenerateColumns=”False”>
<Columns>
<asp:BoundField DataField=”UserName” HeaderText=”Username” />
<asp:BoundField DataField=”Email” HeaderText=”Email” />
<asp:BoundField DataField=”CreationDate” HeaderText=”Creation Date” />
<asp:CommandField ShowSelectButton=”True” />
</Columns>
</asp:GridView>
</div>
</form>
</body>
</html>
In the markup the GridView defines the UserName field as DataKeyName and this enables you to access the UserName value of the currently selected user directly through the grid’s SelectedValue property. With this page in place, you can now add the following code to the Page_Load event procedure for loading the users from the membership store and binding them to the grid:
using System;
using System.Collections.Generic;
using System.Linq;
using System.Web;
using System.Web.UI;
using System.Web.UI.WebControls;
using System.Web.Security;
public partial class MembershipUsers : System.Web.UI.Page
{
MembershipUserCollection _MyUsers;
protected void Page_Load(object sender, EventArgs e)
{
_MyUsers = Membership.GetAllUsers();
UsersGridView.DataSource = _MyUsers;
if (!this.IsPostBack)
{
UsersGridView.DataBind();
}
}
}
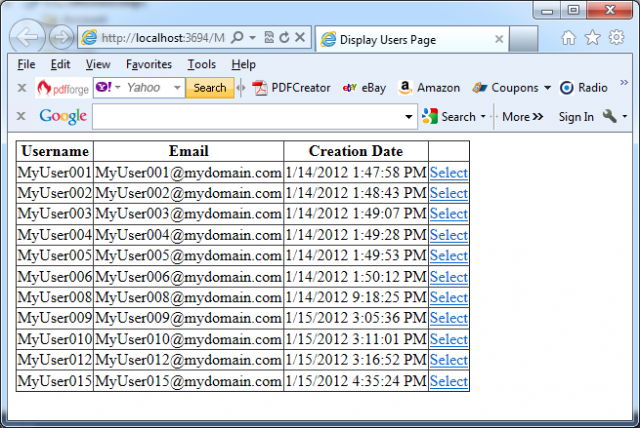
The next picture shows the application in action:
The Membership class includes a GetAllUsers method, which returns an instance of type MembershipUserCollection. You can use this collection just like any other collection. Every entry contains all the properties of a single user. If you want to display the details of a selected user, you just need to add a couple of controls for displaying the contents of the selected user in the previously created page, as follows:
<form id=”form1″ runat=”server”>
<div>
<asp:GridView ID=”UsersGridView” runat=”server” DataKeyNames=”UserName”
AutoGenerateColumns=”False”
onselectedindexchanged=”UsersGridView_SelectedIndexChanged”>
<Columns>
<asp:BoundField DataField=”UserName” HeaderText=”Username” />
<asp:BoundField DataField=”Email” HeaderText=”Email” />
<asp:BoundField DataField=”CreationDate” HeaderText=”Creation Date” />
<asp:CommandField ShowSelectButton=”True” />
</Columns>
</asp:GridView>
Selected user: <br />
<table border=”1″ bordercolor=”cyan”>
<td>User Name:
<td><asp:Label ID=”UsernameLabel” runat=”server” />
<td>Email:
<td><asp:TextBox ID=”EmailText” runat=”server” />
<td>Last Login Date:
<td><asp:Label ID=”LastLoginLabel” runat=”server” />
<td>Comment:
<td><asp:TextBox ID=”CommentTextBox” runat=”server” TextMode=”multiline” />
<td><asp:CheckBox ID=”IsApprovedCheck” runat=”server” Text=”Approved” />
<td><asp:CheckBox ID=”IsLockedOutCheck” runat=”Server” Text=”Locked Out” />
</table>
</div>
</form>
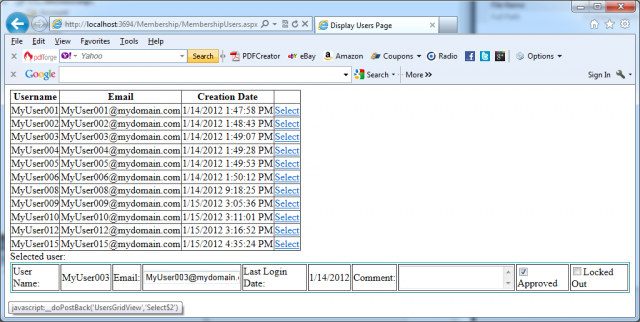
You can then handle the SelectedIndexChanged event of the previously added GridView control for filling these fields with the appropriate values, as follows:
protected void UsersGridView_SelectedIndexChanged(object sender, EventArgs e)
{
if (UsersGridView.SelectedIndex >= 0)
{
MembershipUser Current = _MyUsers[(string)UsersGridView.SelectedValue];
UsernameLabel.Text = Current.UserName;
LastLoginLabel.Text = Current.LastLoginDate.ToShortDateString();
EmailText.Text = Current.Email;
CommentTextBox.Text = Current.Comment;
IsApprovedCheck.Checked = Current.IsApproved;
IsLockedOutCheck.Checked = Current.IsLockedOut;
}
}
The next picture presents the new code in action:


