When you are planning to implement membership API in production environment, you should create membership database manually. ASP.NET ships with SQL scripts that allow you to manually create the necessary database and database tables required for storing user and role information used by the membership API. ASP.NET also ships with a tool that creates these database tables and stored procedures in a database chosen by you. This tool is called aspnet_regsql.exe, and you can easily call it from within a Visual Studio Command Prompt window. The location of the tool is described in the article How to find the correct version of Aspnet_regsql.exe. In the case of a custom provider, you have to prepare and configure the data store used by the custom provider according to the custom provider’s documentation and requirements.
You can use the aspnet_regsql.exe tool in two ways:
– through a wizard interface
– through the command line using dedicated command-line switches.
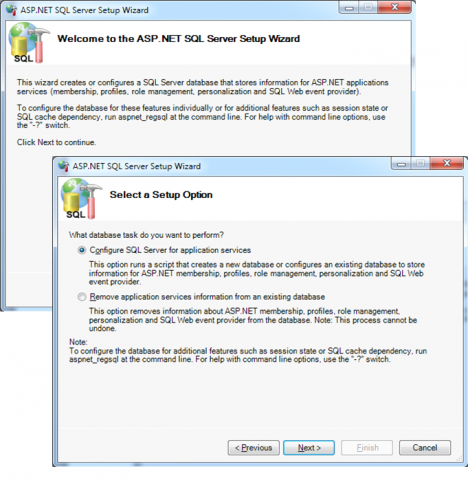
In any case, you should launch the tool from a Visual Studio Command Prompt window, as it includes the necessary path information to the .NET Framework directory containing the necessary tools. If you just launch the tool without any parameters, the tool fires up the wizard interface that guides you through the process of creating a database, as shown in the next picture:
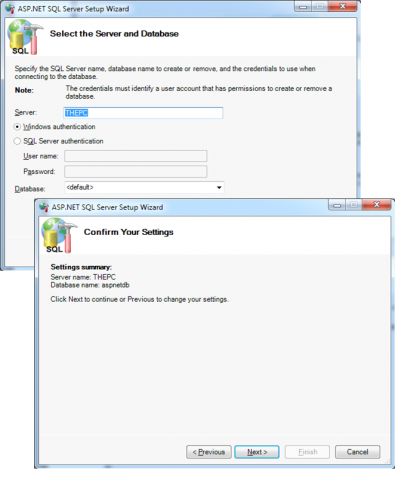
The wizard provides you with the option of either creating the necessary database or removing the tables from an existing database. If you select the <default> option for the database, it looks for a database called aspnetdb on the server you have specified. If it doesn’t exist already, aspnet_regsql.exe creates this database and creates the tables in this database. If the tables already exist in the target database, the wizard leaves them as they are:
If you prefer to use second possible way, you can run the aspnet_regsql.exe tool from the command line. For example, to setup the membership API database tables, you can execute the following command in case if you are working against a local SQL Server instance called SQLEXPRESS:
aspnet_regsql -S (local)\SQLEXPRESS -E -A all -d MyDatabase
In case of Standard or Enterprise edition installed, you can skip the instance name (\SQLEXPRESS), or you can use the instance name you specified during the installation of your SQL Server.
The next table describes the most important command-line switches of the aspnet_regsql.exe tool needed for the membership API and related ASP.NET application services.
| Switch | Description |
| -S servername |
Specifies the SQL Server and instance for which you want to install the ASP.NET database tables. You can use SQL Server 7.0 or newer as an under- lying storage for the membership API. |
| -U username | The SQL Server database user with which you want to connect to SQL Server. This is required if you do not want to use Windows authentication to connect only to SQL Server. |
| -P password |
If the -U switch is specified, you need to specify the password switch as well. This is required if you do not want to use Windows authentication to connect only to SQL Server. |
| -E |
If you don’t specify -U and -P, you automatically connect through Windows authentication to the SQL Server instance specified in -S. With -E, you can explicitly specify to connect through Windows authentication to the SQL Server. |
| -C |
Allows you to specify a full-fledged ODBC or OLEDB connection string for connecting to the database. |
| -sqlexportonly |
Creates the SQL scripts for adding or removing the specified features to the database without installing them on a dedicated SQL Server instance. |
| -A |
Installs application services. The valid options for this switch are all, m, r, p, c, and w, where: – all – for installing all application services; – m is dedicated to membership. – r means role services, – p means ASP.NET profiles for supporting user profiles, – c stands for personalization of web part pages – w means SQL web event provider. |
| -R |
Uninstalls application services. This switch supports the same option as -A and uninstalls the corresponding database tables for the application services. |
| -d |
Lets you optionally specify the name of the database into which you want to install the application services. If you don’t specify this parameter, a database named aspnetdb is created automatically (as is the case with the <default> option for the database in the wizard interface). |


