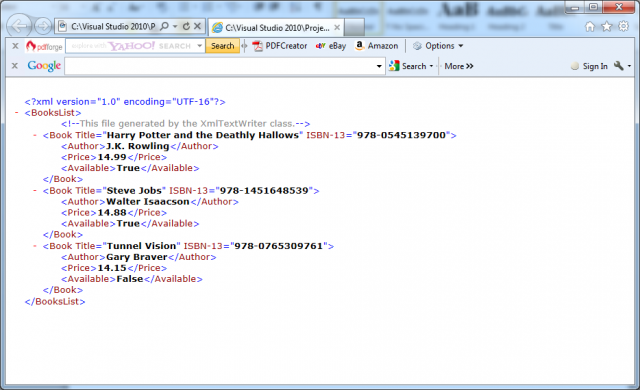
You can create a XML document, by using the basic XmlTextWriter class. This class works like StreamWriter relative, except that it writes XML document instead of ordinary text file. You can follow the next process:
1. Create or open the file
2. Write to file, moving from top to bottom.
3. Close the file.
The next code lines present this idea.
Imports System
Imports System.Collections.Generic
Imports System.Linq
Imports System.Web
Imports System.Web.UI
Imports System.Web.UI.WebControls
Imports System.IO
Imports System.Xml
Public Class _Default
Inherits System.Web.UI.PageProtected Sub Page_Load(ByVal sender As Object, ByVal e As System.EventArgs) Handles Me.Load
If Not Me.IsPostBack Then
WriteToXMLFile()
End If
End Sub
Protected Sub WriteToXMLFile()
‘ Place the file in the App_Data subfolder of the current website.
‘ The System.IO.Path class makes it easy to build the full file name.
Dim File As String = Path.Combine(Request.PhysicalApplicationPath, “App_Data\BooksList.xml”)
Dim Fs As FileStream = New FileStream(File, FileMode.Create)
Dim W As XmlTextWriter = New XmlTextWriter(Fs, System.Text.Encoding.Unicode)W.WriteStartDocument()
W.WriteStartElement(“BooksList”)
W.WriteComment(“This file generated by the XmlTextWriter class.”)‘ Write the first book.
W.WriteStartElement(“Book”)
W.WriteAttributeString(“ISBN-13”, “978-0545139700”)
W.WriteAttributeString(“Title”, “Harry Potter and the Deathly Hallows”)W.WriteStartElement(“Author”)
W.WriteString(“J.K. Rowling”)
W.WriteEndElement()W.WriteStartElement(“Price”)
W.WriteString(“14.99”)
W.WriteEndElement()W.WriteStartElement(“Available”)
W.WriteString(“True”)
W.WriteEndElement()W.WriteEndElement()
‘ Write the second book.
W.WriteStartElement(“Book”)
W.WriteAttributeString(“ISBN-13”, “978-1451648539”)
W.WriteAttributeString(“Title”, “Steve Jobs”)W.WriteStartElement(“Author”)
W.WriteString(“Walter Isaacson”)
W.WriteEndElement()W.WriteStartElement(“Price”)
W.WriteString(“14.88”)
W.WriteEndElement()W.WriteStartElement(“Available”)
W.WriteString(“True”)
W.WriteEndElement()W.WriteEndElement()
‘ Write the third bookW.WriteStartElement(“Book”)
W.WriteAttributeString(“ISBN-13”, “978-0765309761”)
W.WriteAttributeString(“Title”, “Tunnel Vision”)W.WriteStartElement(“Author”)
W.WriteString(“Gary Braver”)
W.WriteEndElement()W.WriteStartElement(“Price”)
W.WriteString(“14.15”)
W.WriteEndElement()W.WriteStartElement(“Available”)
W.WriteString(“False”)
W.WriteEndElement()W.WriteEndElement()
‘ Close the root element.
W.WriteEndElement()
W.WriteEndDocument()W.Close()
End Sub
End Class
Notes:
– You create the entire XML document by calling the methods of the XmlTextWriter, in the right order. To start a document, you always begin by calling WriteStartDocument(). To end it, you call WriteEndDocument().
– The next step is writing the elements you need. You write elements in three steps. First, you write the start tag (like <Book>) by calling WriteStartElement(). Then you write attributes, elements, and text content inside. Finally, you write the end tag (like </Book>) by calling WriteEndElement().
– The methods you use always work with the current element. So if you call WriteStartElement() and follow it up with a call to WriteAttributeString(), you are adding an attribute to that element. Similarly, if you use WriteString(), you insert text content inside the current element, and if you use WriteStartElement() again, you write another element, nested inside the current element.
If you compile and execute the code the result is a file BooksList.xml. To check that your code worked, open the file in Internet Explorer, which automatically provides a collapsible view for XML documents:

