You can use the XmlTextReader class when you want to read a XML document in your code. The XmlTextReader moves through your document from top to bottom, one node at a time. You call the Read() method to move to the next node. In a typical application, you would need to go fishing for the elements that interest you. For example, you might read information from an XML file such as BooksList.xml and use it to create Book objects based on the Book class shown here:
public class Book
{
public string Isbn13 { get; set; }
public string Title { get; set; }
public string Author { get; set; }
public decimal Price { get; set; }
public bool Available { get; set; }
}
Note: You can find how BooksList.xml is created from the article How to use XMLTextWriter to create an XML document in C#.
A typical application might read data from an XML file and place it directly into the corresponding objects. The next example shows how you can easily create a group of Book objects based on the BookstList.xml file. This example uses the generic List collection, so you should import the System.Collections.Generic namespace.
The .aspx file used in this example is:
<%@ Page Language=”C#” AutoEventWireup=”true” CodeBehind=”XMLReaderV2.aspx.cs” Inherits=”WriteToXMLFileVC.XMLReaderV2″ %>
<!DOCTYPE html PUBLIC “-//W3C//DTD XHTML 1.0 Transitional//EN” “https://www.w3.org/TR/xhtml1/DTD/xhtml1-transitional.dtd”>
<html xmlns=”https://www.w3.org/1999/xhtml”>
<head runat=”server”>
<title></title>
</head>
<body>
<form id=”form1″ runat=”server”>
<div>
<asp:GridView ID=”gridResult” runat=”server”>
</asp:GridView>
</div>
</form>
</body>
</html>
The code behind in C# is:
using System;
using System.Collections.Generic;
using System.Linq;
using System.Web;
using System.Web.UI;
using System.Web.UI.WebControls;
using System.IO;
using System.Xml;
namespace WriteToXMLFileVC
{
public class Book
{
public string Isbn13 { get; set; }
public string Title { get; set; }
public string Author { get; set; }
public decimal Price { get; set; }
public bool Available { get; set; }
}
public partial class XMLReaderV2 : System.Web.UI.Page
{
protected void Page_Load(object sender, EventArgs e)
{
if (!this.IsPostBack)
{
XMLFileReader();
}
}
protected void XMLFileReader()
{
// Open a stream to the file.
string file = Path.Combine(Request.PhysicalApplicationPath, @”App_Data\BooksList.xml”);
FileStream fs = new FileStream(file, FileMode.Open);
XmlTextReader r = new XmlTextReader(fs);
// Create a generic collection of books.
List<Book> books = new List<Book>();
// Loop through the books.
while (r.Read())
{
if (r.NodeType == XmlNodeType.Element && r.Name == “Book”)
{
Book newBook = new Book();
newBook.Isbn13 = r.GetAttribute(“ISBN-13”);
newBook.Title = r.GetAttribute(“Title”);
// Get the rest of the subtags for this book
while (r.NodeType != XmlNodeType.EndElement)
{
r.Read();
// Look for Author subtags.
if (r.Name == “Author”)
{
while (r.NodeType != XmlNodeType.EndElement)
{
r.Read();
if (r.NodeType == XmlNodeType.Text)
{
newBook.Author = r.Value;
}
}
}
r.Read();
if (r.Name == “Price”)
{
while (r.NodeType != XmlNodeType.EndElement)
{
r.Read();
if (r.NodeType == XmlNodeType.Text)
{
newBook.Price = Decimal.Parse(r.Value);
}
}
}
r.Read();
if (r.Name == “Available”)
{
while (r.NodeType != XmlNodeType.EndElement)
{
r.Read();
if (r.NodeType == XmlNodeType.Text)
{
newBook.Available = Boolean.Parse(r.Value);
}
}
}
}
books.Add(newBook);
}
} // end of while
fs.Close();
gridResult.DataSource = books;
gridResult.DataBind();
}
}
}
Notes:
– This code uses a nested looping structure. The outside loop iterates over all the books, and the inner loop searches through all the child elements of <Book>.
– The EndElement node alerts you when a node is complete and the loop can end. Once all the information is read for a product, the corresponding object is added into the collection.
– All the information is retrieved from the XML file as a string. Thus, you need to use methods like Decimal.Parse or Boolean.Parse to convert it to the right data type.
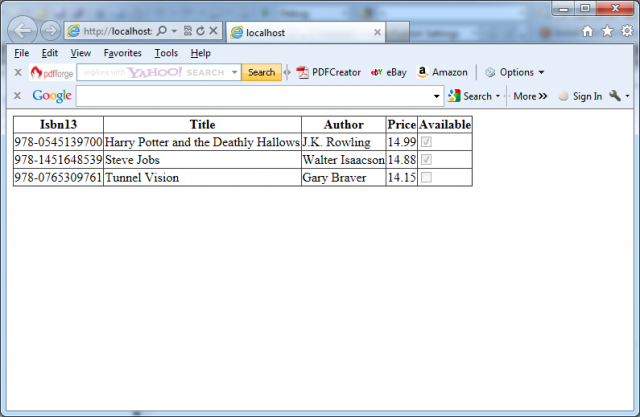
– Data binding is used to display the contents of the collection. A GridView set to generate columns automatically creates the table shown in the next picture.

